Hey everyone, I hope you are having an incredible day today. Today, I’m gonna show you how to prepare a distinctive dish, marbled pumpkin cheesecake. It is one of my favorites. For mine, I’m gonna make it a little bit tasty. This is gonna smell and look delicious.
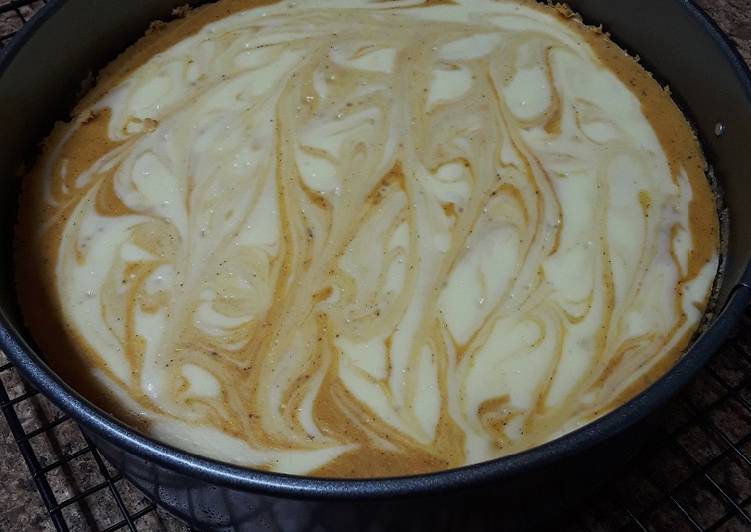
Marbled Pumpkin Cheesecake Marbled Pumpkin Cheesecake. Cut through filling with a knife to swirl. Drop reserved pumpkin filling by spoonfuls over cheesecake; cut through with a knife to swirl.
Marbled Pumpkin Cheesecake is one of the most well liked of recent trending foods on earth. It’s appreciated by millions daily. It is easy, it’s quick, it tastes yummy. Marbled Pumpkin Cheesecake is something that I have loved my whole life. They’re fine and they look fantastic.
To begin with this particular recipe, we have to prepare a few components. You can cook marbled pumpkin cheesecake using 16 ingredients and 13 steps. Here is how you cook that.
The ingredients needed to make Marbled Pumpkin Cheesecake:
- Get Crust:
- Prepare 1 1/2 cups graham cracker crumbs (10 full sheets of graham crackers)
- Take 6 tbsp. unsalted butter, melted
- Prepare 1/3 cup granulated sugar
- Get Cheesecake Filling:
- Prepare 3 (8 oz.) each brick style cream cheese, at room temp
- Take 1/2 cup granulated sugar
- Make ready 1 tsp. vanilla extract
- Get 3 large eggs, at room temperature
- Get 1 cup pumpkin puree
- Get 1/4 cup brown sugar
- Prepare 1 tsp. ground cinnamon
- Prepare 1/2 tsp. ground nutmeg
- Make ready 1/4 tsp. ground ginger
- Make ready 1/8 tsp. cloves
- Take 1/8 tsp. allspice
You'll experience an unexpected treat when you try this Marbled Pumpkin Cheesecake recipe. Chocolate mini morsels are sprinkled on the crust before the pumpkin filling is poured in, and then more chocolate is swirled into the. This is a wonderful pumpkin cheesecake with a ginger nut crust. The ginger nuts really do make a difference.
Instructions to make Marbled Pumpkin Cheesecake:
- Preheat the oven to 300°F. Lightly grease a 9" springform pan with non-stick cooking spray. Then, wrap the bottom and sides of the pan with aluminum foil (heavy duty if you've got it), that way it will be completely water tight for the water bath it will bake in.
- Start by making the crust. In a medium mixing bowl, combine the graham cracker crumbs, melted butter and sugar until they are fully blended and all the crumbs are moistened. Press the crumbs tightly into the bottom and about 1 inch up the sides of a prepared pan. I use the bottom of a flat measuring cup to help press the crumbs down tightly. Bake for 10 minutes, then remove from the oven and set side. Once you take out the crust, increase the oven temperature to 325°F.
- In a large mixing bowl, using a hand mixer, blend together the cream cheese, granulated sugar and vanilla extract until just combined. Then add in the eggs, 1 at a time, blending until just combined after each egg. Remove 1 cup of that mix and set it aside in a separate bowl.
- Next, add to the remaining cheesecake mix the pumpkin, brown sugar, cinnamon, nutmeg, ginger, cloves and allspice. Blend together until just combined…it is important not to overmix!
- Pour the pumpkin cheesecake mix on top of the crust. Then, drop spoonfuls of the regular cheesecake around the top of the pumpkin cheesecake.
- Next, take either a butter knife or a skewer and swirl the pumpkin and regular cheesecake together, just until you have a nice marbled pattern.
- Place the springform pan into the center of a larger baking tray with deep sides. Fill the baking tray with 1-2 inches of warm water. Baking the cheesecake in a water bath will help to prevent cracks in the finished cheesecake.
- Carefully place the baking tray, with the springform pan still in the center, into the oven and bake for about 45 minutes. It is done when the outer edges are firm and very slightly puffy, but the middle should still look moist and a bit wiggly (the center will firm up as the cheesecake cools). Avoid opening the oven door…If you need to check on it, only open the oven door a tiny crack!
- After the 45 minute mark, turn off the oven and open the oven door a crack, but leave the cheesecake in the oven for another hour. After the hour, take it out, remove the pan from the water bath and run a knife along the inner edge of the pan.
- Allow the cheesecake to cool slowly, on a wire rack, at room temperature. Place a baking tray or a large upside-down plate over the cheesecake as it cools. I do this to avoid a dramatic change in temperature, which can lead to cracking. I still check it every 25 minutes or so to make sure there's no condensation forming on the plate. After about another hour or so (once it's pretty much reached room temperature), it's ready for the fridge.
- Cover the top of the pan with plastic wrap and then place the pan into the fridge and chill for at least 6 hours. I like to prepare this the day before and allow it to chill in the fridge overnight.
- Once it has chilled in the fridge for the appropriate amount of time and you are ready to serve it, remove the foil from the outside of the pan and run a knife one more time around the inner edge of the pan. Release the clamp on the side of the pan, then, slowly and gently, remove the side of the pan from the bottom.
- Use a warm, sharp knife to slice the pieces…simply run the knife under hot water and wipe clean between each cut, for neat slices. Refrigerate any leftovers for up to 4-5 days.
The idea of this marble pumpkin cheesecake started after making these chocolate pumpkin bars. As I mentioned in that recipe, the pumpkin layer is actually a pumpkin cheesecake. With cheesecake being my favorite dessert it was obvious I would make a pumpkin cheesecake with some of the pumpkin I just bought. Add remaining sugar, pumpkin and spices to remaining batter mixing well. Spoon pumpkin and cream cheese batters alternately over crust.
So that is going to wrap it up with this special food marbled pumpkin cheesecake recipe. Thanks so much for reading. I’m confident that you can make this at home. There is gonna be more interesting food in home recipes coming up. Don’t forget to save this page on your browser, and share it to your family, colleague and friends. Thanks again for reading. Go on get cooking!